Friday, July 18, 2014

Disillusioned

I have been so busy with things going on in my life I haven't had time to write. But now...I really feel I need to take the time. This won't be my usual blog, informative, instructional, etc., but instead I am going to rant...just a little, and I hope you will bear with me.

Disillusionment you say? Yep. My disillusionment comes from what is going on with people in my social world, or actually with peeps in general. Let me expound. I will do this in generalities, but you will get the gist.

For the most part, we all work really hard to get along on social media, as it is not only a place to connect, but a good way to market what we do. We tolerate a little bit of emotional fluctuation from our friends and the little outbursts that come with day to day life situations, because we "are" their friends. We do our best to soothe those of us that aren't feeling well or have had tragedy in their lives. We like to join in the fun and the jokes others present to us, and we respond to each others art positively and constructively. Well...most of us do most of the time.

What I see happening over and over, and not in huge numbers but enough to disturb me, is the attacks that come from inside our group, one against another. Having been a student of psychology, both animal and human, I understand the "whys" of what makes it happens. What I don't understand is just this:

For the life of me, I don't understand what makes people think they have the right to attack or make fun of someone, regardless of who they are or what they are doing. Perfection is illusive to "all" of us, not just some of us. Most of us have become who we are through things that have happened in our lives in our past and/or is genetically driven. Most of that is what makes us good, great, or superior artists. Some of it makes us good business people. Some makes us sensitive and vulnerable. Some of it makes some of us feel entitled and angry, or feel inferior to others.

Some of us use flowery expressive speech, while some of us are strictly Type A and demand the short version of the truth. Some of us are recovering Type A and have learned to love flowery speech, never intending to harm another. So what is the truth? Let's do a short examination of the truth.

Truth is most often used to mean being in accord with fact or reality. The truth is the truth, regardless of how you say it, whether you color it up with adjectives and adverbs or not. It is still the truth if it represents fact or reality...as we see it or know it. But as long as a person isn't purposely misleading someone for whatever personal reason, what's the point in attacking that person. The last time I looked, it was still a free country, and we still have the power of free speech. Otherwise, I wouldn't be able to put this to paper, or internet, or blog, or whatever.

Another thing that has brought me to tears recently (and yeah, I'm talkin' real tears here!) is that there are those that join in someone's tirade against one of their (our) own, for whatever reason they use to justify their nonconstructive criticism . And...here's a big one...have you, as a human begin, ever tried to get into another person's skin before you've criticized them? Have you asked pertinent questions to get to know the person you have an issue with? or do you just go off?

Everyone does what the do a certain way for a reason, and before you attack perhaps you should get to know that person better, ask some questions, get to know them to find out what makes them tick, what makes them do the things they do. Maybe they just need approval, maybe they don't feel well, maybe they have issues at home, or maybe they struggle with being financially stable.

Whatever this person has done to irritate you, you have an ethical and moral responsibility to resolve the issue one on one first. I challenge you to be better at this. I challenge you! When something happens that irritates you, sit back, take a deep breath, and ask yourself, "Does this person need me in some way? What makes them who they are? What makes them tick? What made they do this thing that rubbed me the wrong way?" If you can't or won't do that, then I challenge to look at your own morality and ethics.

Hey, I've been guilty of it, too. But I try to work hard not to get caught up in this destructive behavior anymore. Do I still get caught up? Yes, if I'm not careful I do, and I hate myself later for it and I try to make it right with those I stupidly wronged. Does that make me think I'm perfect. Heck no!!! But it does put me on a path of less malignant behavior and on a path of more positive, nurturing behavior.

If I could have one thing in this world, it would be for people to foresee how their words or actions can hurt or even emotionally destroy another human being. As artists, most of us are pretty sensitive, so this isn't hard to do. Social media has been a breeding ground that allows negative behavior to spill out all over the place, and it is happening more and more all the time.

People used to have to confront another person face to face if there was an issue. What do you want to bet that confrontations didn't happen very often? Now, with email and social media, those that would spread their venom have a quick and painless (for them) way to spread their negativity all over the place, and they thrive on it, like a dog is attracted to its own vomit. Sorry, that was pretty harsh, but true.

Again, I challenge you all! Before you "like" or comment on something negative, stop yourself and think about what your are doing, and what it might do to another person, one of your "friends," one of your peers. Have you done all you can do to understand who that person is? Have you truly made an effort to get to know that person? or have you chosen a bitter and self-destructive lifestyle that can and will come back to haunt you?

There is an old saying that goes like this: What goes around, comes around. And I can tell you from personal experience...it's true.

I would say my usual Stay Wired Up, but I think that would be disrespectful after all this. Thanks for letting me speak. Comments are welcome, but if they are completely caustic or mention names, they will be deleted. You have the right to right them, but I have the right to get rid of them. Thanks guys!

Saturday, May 10, 2014

What the Heck is a Soumak Weave?

There have had a lot of questions about the Soumak weave, and the variations of it that I use when weaving wire. So, I've decided there is no time like the present to cover this subject.

I discovered the Soumak weave in a tutorial on YouTube when I was first researching different types of weaves I could do with wire. I have to credit Beadaholique here, and this is a link to that tutorial: https://www.youtube.com/watch?v=8uoGp6yF5q4 .

I watched this video about 20 times, or until I came up with a variation I could live with that would work with wire. Don't get me wrong here. I probably didn't come up with anything that original, but having not been formally trained in wire weaving, this technique was new to me and I adopted it. I still use it to this day.

The Soumak weave goes back centuries, some rug experts say as early as 2000 BC. It was used in linen, as well as wool weaving. It has been used to some extent in weaving of all sorts to this day. Here is a diagram I found on the web that pretty well describes the Soumak and how it is achieved.


Diagram credit: Barbara M. Berk

www.BarbaraBerkDesigns.com


As you can see, it is what I call and up and down weave. Let me describe it in "wire-ease" to make it easier to understand for the wire weaver, and I will include some photos for all you visual folks. I am going to assume that you already know how to do some basic wire weaving, so if you have questions I don't address here, feel free to message me.

 Using the above diagram, you are going to go two wires up and loop, go two wires more and loop, go two wires more and loop until you are up to the top wire. You will make another single loop on the top wire, cross over the second wire down, and go two wires down and loop, two wires down and loop, continuing to the bottom. Just follow the diagram above and you will have a true Soumak.

The variation I use the most is shown in my series of photos here. This is the weave you have all asked to see done. I begin the same way as the diagram above.

I start out by making three rounds (Step 1) around the bottom wire. (I am using 18 gauge frame wires and weaving with 26 gauge.) Step 2: Take your weave wire up and around the second wire. Pull your wire between the first and second frame wire towards you, as seen here. Go up and around the second and third frame wire.


In Step 3, you continue the weave by bringing the wire towards you between the second and third frame wire. Take the weave wire over and around frame wire 3 and 4. Then toward you between wire 3 and 4.


  Repeat the pattern for the fourth and fifth frame wire. Your first "up" round should look like the Step 4 picture.


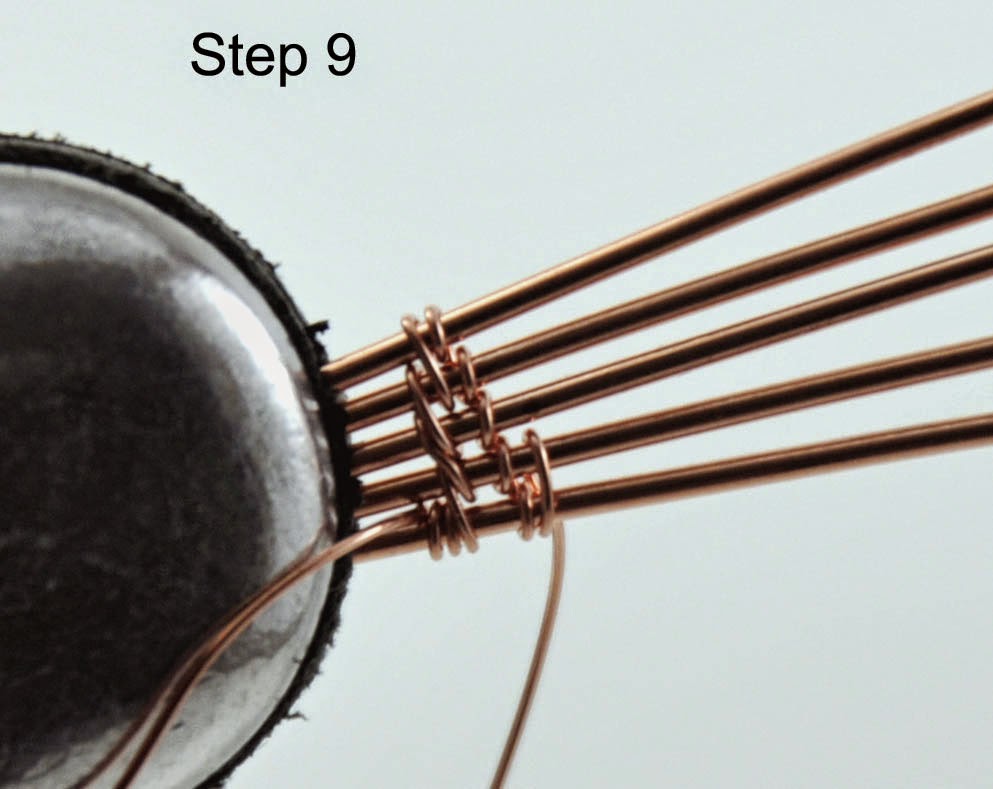
In this step, you will bring the wire towards you around wire 5 and between wire 4 and 5 and up and around wire 5 again. Just like in this photo.


At this point, you are going to reverse your thinking, and take the weave wire down two wire in the back of the frame wire, and bring it between wire 4 and and 3 towards you.


Take the weave wire around the fourth wire, as seen here. You will continue this pattern until you get to the bottom wire again.


You have just completed one full round of two-up and two-down. I hope this makes sense. And you will probably recognize the weave if you've been working with wire for any length of time. A lot of wire workers use this same weave. We just all call it something different.


You can now repeat the pattern as much as you want, making sure to push your stitches together tightly as you work.


Here is what round 2 going up the frame should look like.


Here, I have done three rounds and pushed the stitches together. 
This is the weave I use to make a lot of my bracelets.


The absolutely cool thing about this weave is that is is the same on the back as it is on the front. This is a pic of the back. Neat, huh? The idea...not my weaving...lol!

Oh, and that is my ring vice holding the wires. That is my favorite tool in the whole world, when I am weaving. I wedge that little bugger in between my left elbow and my side and have both my left hand and right hand free to separate wires and keep my weaving flowing and smooth.


That's about all I have to say about that for now. I hope this was informative and gives you an idea of how to do this particular variation of the Soumak Weave. If you have any questions or comments, be sure to let me know, and I will do my best to answer them in a timely manner.

Hugs to you all, and remember to Stay Wired Up!!!


Monday, April 7, 2014

Jewelry Expanders...A Lifesaver for My Business

Gee folks, I am so sorry to be gone so long. Season here in Florida was super busy for me, and I was a real slacker when it came to taking care of my blog. But...I am back and with a vengeance.

Have you ever had someone try on a bracelet or necklace, only to complain that it is too small or too short? That has been a constant issue for me, since I make my own chain and bracelets, well, you know how it goes. They are either too small or too large. If you weave and try to make lots of different sizes, you will often be left with some that won't sell due to size. At least that is how it goes for me. So...I came up with a really cool solution that I am going to share with you now.

It's extenders. I have been making them for a while now. Some I sell separately, so the peeps can add them to my jewelry or to other pieces they may have at home. Some extenders are right on the jewelry I market.

First of all, I purchase 8 to 10mm closed jump rings in sterling silver and copper. Yes, I purchase these from UnkamenSupplies on Etsy, actually. If you remember, my husband isn't quite sure about me having a torch. I told him, "Shoot. I can only burn the house done once." But he didn't think that was too funny. He did reluctantly agree that I could get one, but I just don't have the time to deal with learning how to use it right now, so currently I do buy these (Sorry to all of you purists out there...) I am trying to get there. Fire scares the @#8& out of me, too!

I'm sure you can request closed jump rings in other metals, as well. Ralph, owner at UnkamenSupplies, is pretty accommodating and does custom work, too. Anyway, here is how I do it and some pics to give you visual designers a bird's eye view.

 This is an expander that has been permanently attached to the bracelet clasp using 6mm open jump rings x 2 (for added strength) and 8mm closed jump rings. This usually gives me 1/2 to one full size expansion on a bracelet. Cool, huh?

These expanders were created to add to a bracelet or necklace a customer wants but needs or wants a larger size. They are created using a figure-8 link and 8mm closed jump rings. The 8mm closed jump rings I use are made of 23 gauge sterling silver. Sounds like a small gauge to use for this project, but I have never had an issue with them losing their shape with normal handling or wear. And they give the extenders a finer more elegant look.


First of all, I get out my needle nose pliers that has the smallest noses on them. I mark the noses at about 1/8 of an inch from the edge using a Sharpie. Don't worry, it does rub off. You will see that the more you use them. Set them aside for right now.


I like my figure-8 chain pieces as small as I can get them, so I cut my 20 gauge dead soft wire pieces just a little over 5/8 of an inch long. Don't worry. If you have never made figure-8s before, start out with 3/4 inch of wire or a little more. Once you have them cut, trim the ends so they are flush on both ends. Trim as little as you can to get a flush end. The more you practice this technique, the smaller you will be able to make your links. My links are 1/4 inch long when they are finished, and here is an example. Trust me, they didn't used to be that little!


You want to position the end of your cut wire piece into the needle nose pliers right on the ink mark, about 1/8 inch in from the end of the noses. Keep a moderately firm grip on your wire. Don't use a death grip or you will dent the wire every time, and some of those dents are hard to get rid of, even in a tumbler.


You are going to hold the end of the wire that isn't in the pliers and with that great grip of yours, twist the pliers toward you slowly. If you do this slow enough, you will be able to tell when your wire's flush end comes down on itself. You can now take the half done figure-8 link off your pliers.


You can see here that I didn't quite get my wire to where it touches itself. I can either correct this now or when I finish the link. Your choice, but you will want to do that eventually or your link will not be smooth and could possibly catch on clothing or worse yet, someone's hair or skin.  Ouch!


Place the straight end of your figure-8 wire back into the needle nose pliers, remembering you are going to bend the wire in the opposite direction that you bent it before. I stress this only because you have no idea how many times I bent both sides the same way, only to then have a piece that was not exactly what I hoped for...


 I grab the end of the wire or use my other hand's index finger to help bend back the wire and stabalize it to get a more accurate bend. Yep, you will get sore fingers. I can do about 100 links before I have to move onto something else. If you like, instead of using your index finger, hold the finished end with your flat or chain nose pliers. If you use this technique, a firm grip is needed. The wire may slip otherwise and leave you with a damaged link.

Remember to bend around the needle nose pliers so you get a uniform bend.


You are going to keep bending until your link looks something like this.


Now that you have your connector link done (the figure-8 link), you will be using your flat nose pliers and your chain link pliers to properly bend the figure-8 link out, so you can add your closed jump ring. With the upper part of the figure-8 link held firmly in your flat nose pliers, grasp the upper part of the lower loop of the link with your chain nose pliers and twist the loop toward you.


Make sure you have a firm grip on the chain nose pliers, as well. If the pliers slip off the wire, it can mar the wire enough that it will render the link unusable. Trust me, I've done this. 


Slip the closed jump ring on the figure-8 link. Carefully close the figure-8 link with your needle nose pliers. Sometimes I put the entire link in my flat nose pliers to give my figure-8 link a nice flat shape. Make sure your looks are closed. Add another closed jump ring to the other end of the figure-8 link and continue the same pattern until you have your desired extender. Add a claw clasp to one end or the clasp of your choice. And...you are done!! Yippee!


I hope this has been informative for you, no matter your skill level. I do have to apologize for some of the pics. I was taking pictures myself, using my own hands, and snapping my shutter with my chin. Yep, it was a sight to see.

Anyway, love you guys! As always...Stay Wired Up!!!

Sunday, January 26, 2014

Practicing Your Wire Work with Craft Wire versus Copper Wire

In a past issue I wrote about Craft Wire, what it is, and briefly how it is made. Today I want to expand on the subject just a little and give you some information that might help you make the decision pertaining to whether or not you want to practice your wire wrapping or weaving with craft wire or natural copper wire.

The first thing to consider is what you are going to practice on. Does your wire need to be soft, like to wrap a ring around a ring mandrel? Or are you making a bracelet that needs to hold its shape when it's done? The reason for this thought process is the consideration of the softness of the wire you want to practice with. Normally, and I am providing this info on my experiences, craft wire is very, very soft. But then that depends on the "brand" of craft wire you are working with. There is always that "but." Ugh...

Personally, I have purchased some craft wires that were abnormally hard, as far as craft wire goes, and that is the Artistic brand. Artistic wire is a little more pricy but I like working with it when it's called for, because it is less likely to distort as I am forming it. That being said, I am not promoting their craft wire product over another. It is just one that I like for that reason for certain processes. The point being made here is that you need to know what you are going to practice doing.

Remember from my other article that craft wire is usually coated (enameled) or bonded with a very thin layer of another metal, like silver or gold. These layers are so thin, they can easily be "worked" or "worn" off, even if they are coated with a clear coat. If you are going to practice and want to use a craft wire, use the copper variety. The only two problems you might run into is cost and pliability for your project.

I know. It sounds like I'm running in circles here. And I do need to stick to the topic: copper vs.
copper craft wire.

Let's look at hardness first. Copper wire is manufactured in rods, most normally in gauge 2, or 5/16 of an inch in size. The rods are then pulled through a series of synthetic diamond dies that reduce the rod in size or gauge. Manufacturers use coolants and synthetic lubricants to keep the copper from overheating and/or to reduce friction as the rod is pulled through.

You've probably heard or read this story of gauging wire before, but I am going to get to a point here.  As the rod is pulled through this series of dies, it is constantly getting harder and more brittle. If you've already worked with copper wire, you know that the more you work with it, the more brittle it gets, brittle to the point it can break. Once you pull rods down through the dies to get to 26 or 28 gauge wire, it is extremely brittle, so it is annealed to soften it back up. For the manufacturer, annealing means running an electrical current through it until it reaches a certain temperature. Then it is immediately cooled.

Why am I telling you this?? Well, the process of adding another metal to coat a copper craft wire is electroplating. Electroplating consists of electrically bonding of one surface to another, but I am not going to go into that entire process. You can look that one up on your own. Do it! It will be good for you!

Anyway, if annealing (adding electrical current to the wire in the manufacturing process) is softening the copper wire, and electroplating is adding electrical current to the copper core, doesn't it make sense that copper core craft wire will be slightly softer than its natural copper counterpart because electrical current has passed through it just one more time? I'm using deductive reasoning here, so if there is a metallurgy expert out there that can refute this, please...email me or comment! I really would like to know.

That is the long form of telling you this: If you are going to use natural copper, sterling (a whole 'nother subject!), or gold wire to weave or wrap a project for sale or personal use, you have to decide what might be better to practice with: craft wire or natural copper wire. I won't be there to help you. You have to decide for yourself. I'm just trying, in a very clumsy way, to give you more information to help you with that decision.

Whew! That was almost painful. Now to the second comparison of copper vs. copper core: COST! And don't most of us have to worry just a little about how much money we spend on our hobby or business? Let's do some calculating.

Craft wire can cost anywhere from $.01 to $.05 a foot. Look at the cost of your spool  and divide it by the number of feet in you spool. That will give you the cost per foot of whatever wire you are considering for practice. Don't forget to add in the cost of your wire acquisition. Are you driving to the location to purchase? Figure in the cost of your gas. If you are ordering your wire online, you will most likely have to pay shipping and/or handling. That needs to be added in, as well, before you divide your cost by the number of feet you have.

Have I made you want to get out of making jewelry yet? Gee, I hope not! But...you need to consider these two things in your decision of what to use to learn or practice your craft. The one thing I won't do is make that decision for you. Personally, I still use craft wire for some projects, and copper wire I buy by the one pound spool for other projects. But when "I" practice a new technique, I use natural copper wire. Look at it this way, if my practice project works out, I can antique it, seal it and wear it myself, Yippe!!

Have fun, everyone! And Stay Wired Up!!!

Saturday, December 28, 2013

Just Another Artist Pulling Out of Etsy

I have been reading a lot lately about what Etsy (a seller's marketplace that supposedly allows only handmade items) is doing to the "handmade" market. I have to say that I do still have my Etsy shop up and running, and even though I have never sold a thing there, have kept it strictly for marketing purposes. Now...I am reconsidering that decision.

For those of you that don't know about Etsy, it is a marketplace that was started to feature handmade items from all over the world. At this point in time, there are probably over 30M items for sale, with the Jewelry category being one of the largest on the site. Since its inception, Etsy has gone from "handmade" only to three sections: Handmade (or I made it), Another From My Shop (made the item), or Another Company or Person (made the item).

When you look at those three sections, the first two are pretty much self explanatory. The third, however, is ambiguous. Another company or person leaves a lot to the imagination. Etsy does ask that if you design something and have a manufacturer make it for you, that you fill out their form with specific questions as to how much this company had to do with the design itself or the making of your product.

That is a big "whatever" from me. Okay, honest people are going to go through the process in hopes that Etsy reviews their form and puts their stamp of approval on their selling their product(s) on the Etsy forum. Seriously, do you really think that everyone is going to do that? Or do you think they will stretch that request all out of shape to fit whatever they want it to mean and do it without telling Etsy?

If you think most people would go through with that "process" I have had my laugh for the day at your expense...sorry, kids. When money is more important to someone than coming clean, usually the money will win. Makes me sigh...a really big sigh. But I feel that is the truth. So sad...

To add insult to injury, Etsy's third section of "Another Company or Person (made my product), pretty much says it all, right? That leaves it wide open to market just about anything from anyone or anywhere. They do have a list of things you can't market, like porn, drugs, alcohol, and other illegal substances like ivory.  What I found amusing was that the list of prohibited items was actually longer than the area that defined "handmade."

Personally, there is a lot of discrepancy when it comes to how we define the word "handmade." What it means to me might not be what it means to you. For me, it means making everything included in the designs I make, down to the jump rings and clasps. Wait a minute! Don't get mad at me just yet!

That doesn't mean that if you string beads to make your jewelry, that isn't handmade. Sure it is. You are using your understanding of color and aesthetics to design your piece, just like I do. It's a personal thing for me, just like it is for you. Still love me???

Where I draw the line is where most of you do. When someone in the booth right next to you is selling necklaces from China for $12, while your handmade ones are marked $35, it can be pretty discouraging. Trust me, I've been there, and it ain't much fun!!!

I am a little off track here, but let me elaborate a little. My motto has always been "Live and Learn." Everything we go through in everyday has a purpose, and most of it is to teach us something we need to know. Hey, I'm included in that. I learned not to do as many craft shows (if at all) because they were usually a bust for me...as I am the one that got stuck next to the "Made in China" jewelry booth. Customers all oooo'd and ahhhhh'd over my stuff and then went to her booth and bought. And she had the nerve to look at me and wink...ugh.

Craft shows are less expensive to do. I understand that. However, I would rather do one or two good shows a year (maybe juried shows) than ten less expensive shows, where I could be totally shut out in sales. So, I save my money until a good one pops up. Sometimes you have to plan ahead, as these shows fill up fast, but it is worth it.

Back to Etsy...I will probably get kicked out if they get wind of this anyway, so I may as well shut that puppy down now. I have to stand up for what I believe in and that is handmade should be handmade and not titled "handmade" because someone somewhere made it!

Well, I'm done ranting for now. I would like to finish with this: Don't let your anger wear you down. Anger is not only a sin, it is bad for your health, both mental and physical. Be determined to be better than those other guys. Walk with your head up and be proud of what you do. If you aren't selling enough, research and consider other selling arenas, like galleries and retail shops. YOU CAN DO IT.

Anyway, I'm pulling MY Etsy store before they catch me! Have a great day...and Stay Wired Up!!!


Friday, November 29, 2013

It's the Holidays! Why Not Have a Sale!?!

That is just what I am doing! When you weave wire like I do, or make molded silver jewelry, or bead, or cut cabochons, or do anything related to jewelry, you know that your time is money, and it takes money to fund your "time" doing what you love.

Okay...that was a mouthful, huh? But the reality is just this: We all have a certain amount of time to work, play, and shop, earn money, and spend money. Research has shown that this year is supposed to be a banner year for online shoppers.

Did you know that 45% of online shoppers have bought something they would not have bought in person? Did you also know that 96% of people are more apt to buy on a site that offers free shipping? (http://visual.ly/online-shopping-trends-2013-14)

Those statistics are huge if you, like myself, are doing the majority of your sales online. Of course, you may have a website and do most of your sales elsewhere. Wouldn't you like to increase your sales online to add to your bottom line?

Let's look at some reasons customers are turning to online shopping: The cost of gas. Parking at the mall. Fighting the crowds, especially with children. Finding the right gift in the time you have to shop. And that is just a few reasons people are turning to online shopping. Do you know that 73% of shoppers do at least 1/2 of their shopping online? That's huge!

Here are some more stats to digest. There is a shopping cart (at the store) abandonment rate of 65%!!! The average order for an online buy is over $118!! 79% of people would rather get free shipping than a discount. 62% rarely return items bought online!

Well, that's enough statistics. If you have a website, ramp it up and email your customers and post it all over your social media site. It's time to get serious about sales. So...I will start by having my own...

SUPER SALE

at ggChambers designs

I have lowered prices by 20% or more on most items, and I'm adding sale items every day just for your Holiday Shopping!

Free Shipping, too, that used to be contingent on a sale of $50 or more. But I am lowering that today to $0 required. That means everyone will get free shipping no matter what you order!

No restocking fees if you return an item. (Does not apply to custom orders) 

New Shopping category: Jewelry Sets

So what are you waiting for???

ggChambers designs

Saturday, November 16, 2013

Some Time Later, The Copper Test, and Life Happens

Well, I promised an edition yesterday, and like the title says..."Life Happens" and so it did. You are getting the latest and greatest today instead.

I was walking around the porch Thursday and noticed I had left the copper testing coils outside. I thought you might be interested in some results to date on our sealers. I was.

This picture really doesn't do the results justice. The top row is your unpolished and Maas results from weeks ago. In real life they all have a nice "brown" patina. To some of you, this might be totally unacceptable. To others who might like browns, this might be just fine.

The bottom row is, of course, the coils with one coat of ProtectaClear, again ranking the shiniest and most untouched by weather. Bottom row on the right is the Ren Wax, which actually fared a little better than those on the top. This was a pleasant surprise to me, as it has been warm and humid down here in lower Florida. No, that wasn't a dig to those of you that live in the snow belt. Just the facts, Ma'am, just the facts.

Undoubtedly some of you may have already purchased or used some of these products yourself. What you probably found was that the Maas really does shine up nice. The Ren Wax may have dulled a little, but with another coat, polishes up just fine. The ProtectaClear is still going strong, but has made your item a little "stiff."

The makeup of this product will make your woven wire and wire wrapped items more firm, for lack of a better word. I know it does my woven wire bracelets. Without the sealer, some thinner banded items had a certain amount of flexibility as you tried to twist it back and forth. The addition of the ProtectaClear eliminates some of that play. For me, this is a good thing and doesn't bother me.

If, however, you apply it to chain or dangle earrings, you will have to work them a little to loosen them up again. And this is only after the item has had enough time to cure. Check the Everbrite website for more information on that.

Again, I am not necessarily promoting this product or being abnormally contradictive about the other products. But I want you to have good and thorough information as you use these products for the first time. At least you might know a little about what to expect when you do your own applications.

I hope you all have a really great weekend.  I'll be writing more soon. In the meantime, remember to Stay Wired Up!