Monday, October 9, 2017

How I Use ProtectaClear

I know my next order of business was to talk more about using Gun Blue and Liver of Sulfur. However, some questions recently arose that pertained to Protecta Clear jewelry sealer and how I use it. I’ve messaged several people about it, but then I forget how much I’ve told each individual, so I thought I would put down exactly what I do here, and hopefully there will be fewer Oh-Oh’s later on. Not that I mind your questions, at all. In fact, I welcome them, but I do want to make sure I’m clear on some points relating to my use of this product.
In relationship to jewelry and the jewelry community as a whole, the conundrum seems to be “to seal or not to seal.” I didn’t seal my jewelry for a long time, but my love for the art and comments from customers about tarnish led me to seek out a product I could seal with that wouldn’t ruin what I made. I have used ProtectaClear for about 6 years now. I did a copper test when I lived in Florida, one of the most humid states in the US, and blogged about that in 2013.  That was a really long time ago, so I should probably do it again. Now, I’m in Texas, another super humid state. More on that later.

So…since Gary and I RV full time in a 38-foot fifth wheel, space is hard to come by. This little area is the space I use to seal my jewelry. I usually only seal one to 10 pieces at a time, depending on what I am working on, so this space works well. I have about 26 inches by 20 inches to work with. See, you don’t need a huge work room to get this done.


This is what you need to get started: a couple old towels, and three or four layers of wax paper. Make sure your towels are large enough to cover the area you want to protect, in case of splashes. I’ll explain that in a minute. The wax paper keeps your jewelry from sticking after it’s been dipped.


You will also want to make yourself a good hook, similar to the one shown. I use 18 gauge Half Hard copper wire and put a few bends in it just to strengthen it a little. You want it to be six to 8 inches long, depending on the container you use for your ProtectaClear.


(Don’t forget, you can click on the pictures to enlarge them.)
NOTE: Paper towels, you will need lots of paper towels! You should have about 4 layers close to your jar, as shown.

Here you can see my entire set up. It all fits well into the small space and is efficient. I found a glass jar at a hobby shop that has a wide mouth, a little over four inches at the top when open. It allows me to put a large cuff or pendant right down into the ProtectaClear. I try to keep enough ProtectaClear in the jar to cover an average bracelet.
One thing to remember is that ProtectaClear is a “solvent based” sealer. What that means to you is this product can dissolve certain things…like plastic gloves or a plastic container. Use a glass jar. The annoying part is that the only type of rubber gloves your can wear that won’t dissolve are too bulky to use in this process. So, I use blue Nitrile gloves, as they are a little stronger than latex or common household rubber gloves. Those go away quickly. Even though the Nitrile will also dissolve, they do so slower than the others and I wear them mainly to protect my hands and my lovely blue fingernails. I do, however, try to avoid contact with the ProtectaClear as much as I can. Hence, the creation of the copper hook.

Anyhoo, this is my setup and what I use. I would preface your use of this product by reading all the product knowledge base on the Everbrite Coating website before you begin. It will save you a lot of headaches and questions later on.  If you do run into issues, give them a call. It’s a family owned business and they are super helpful.
My project: I recently sold this bracelet that has been in storage for a while and even though it had one coat of ProtectaClear, it did tarnish. I had also tried polishing it with a recommended paste polish. I cannot stress enough that if you weave wire and do so very tightly, not to use a paste or polish that could dry in the cracks. Getting that out is a nightmare. Everbrite has some new products to polish on their site I haven’t used, so if you are brave enough to try them before I do, go for it.

What I did to clean this bracelet up without ever getting it damp in any way, shape, or form, is to use my Dremel and some of the 3M colored polishing wheels. It took me about 5 minutes with a 200 grit and here is the result. I know, right??? Amazingly clean, and no acid to worry about having to neutralize before I seal. BTW, if you use something acidic based to clean your jewelry before sealing, ya gotta neutralize that acid in a soda bath and dry it completely before sealing. Any moisture or acid will be trapped under the sealer, and you have tarnish…under the sealer.

We are ready to seal. I do not recommend the Spray sealer. Tried it and it does not level out good enough to make a good seal on woven wire. Especially on tightly woven wire. And…unless you want a dull finish, do not use the Satin finish sealer. They do make one, but again, I don’t recommend it for jewelry for two reasons. 1) it’s dull, and 2) you have to stir that stuff all the time to keep the finish even. If you’ve ever used satin sealer on your furniture, you know what I mean. Use the regular clear ProtectaClear, made specifically for Jewelry.

Take your hook and place it somewhere around the piece you will be dipping where the hook won’t get stuck, and slowly lower your piece into the ProtectaClear. I must make a note here, or I would be amiss. Do not use this product on soft stones, i.e pearls, Rainbow Calsilica, and others with a MOH’s hardness rating of less than 4.5. You can test a piece if you like, just to see what happens, but don’t do it on a finished piece of jewelry, please. I’ve had great success on most stones. I did have a Jade that became a little discolored, but it didn’t hurt the stone itself. Use your best judgement. Nothing soft and noting porous. Oh, and beware if you’re using dyed stones. If you don’t know if they are dyed, once you dip them, you will. Most dyes will bleed into the ProtectaClear. Remember…solvent based sealer! Okay, nuff said for now.
I put the whole bracelet down into the liquid and let it sit for a minute, and you can wiggle it around with your hook to make sure everything gets covered.

Using your hook, bring the piece up and out of the jar, holding it over the opening so it can drain. Try not to drop it back into the liquid…you get splashes that way, and you will be wiping them off of yourself and your work space…or they will harden and become part of whatever they are on.  Yes, I still have a drop stuck to my counter top, but so far my husband hasn’t noticed it.
Once the dripping slows down, we don’t want to waste the ProtectaClear, gently set your piece down on your layers of paper towels to soak up a little of the excess.  Don’t let it stay on the paper towel but just a few seconds, just long enough to soak up a little extra liquid. We want most of it to stay on your jewelry. You can quickly flip it over if you want, too. ProtectaClear is a self leveling product and will not develop drip marks. At least I have never had this happen.
On that note, when dipping pendants, role up one end of your towels and wax paper to make a little angle, and place your pendants on that incline. That way, the excess will run down hill., and can be toweled up with a paper towel after it has sat for a while. You should never notice a drip mark.

Now that you’ve done that, remember, no longer than a couple seconds, move your jewelry to the wax paper. as shown here.

Check your jewelry after about 15 minutes. You will notice that some of the ProtectaClear has drained off and began to pool. You can use your hook and push your jewelry to another area on the wax paper. You can now use some paper toweling to mop up the extra ProtectaClear. Be careful not to touch the front surface of your cabochon or stone while it’s drying.  Now is a good time to turn your piece over, too.
According to the Everbrite Coating website, it should only take less than a day to dry. I usually let my pieces finger dry ( dry to the touch ), and then re-dip them, and go through the process again. This time, I let them dry overnight in a safe, dry, spot, or for at least 24 hours before shipping. The product has to “cure.” You can read more about that on the manufacturer’s website. Once cured, you will have a lovely shiny product you will be proud to share with your customers, family, or friends.

***Remember, too…this is a chemical product. If you can’t ship it to a PO Box, which you cannot, you know it isn’t safe to have around young children or where pets can get into it. The paper towels should be thrown away in a safe place, and you should use this product in a ventilated area. Take care of yourself, too. Don’t hold your head over the jar and breathe in the fumes while you are working! The chemical Data Sheet is listed on Everbrite Coating’s website, if you care to read it.

Once dried, it is non-toxic and clear, and I have yet to find someone who cannot wear jewelry sealed with this product, but that does not mean it can’t happen.

Also, just because your product has been sealed, does not mean, that if in the right environment, your item cannot still tarnish. Never guarantee the item will not tarnish. People do weird things with their jewelry, and there is always that person out there that sets out to prove you wrong. Just food for thought.

I hope this article has been helpful to you if you’ve been considering using the ProtectaClear product. I, personally, love it, and will continue to talk about it and use it. Feel free to message me with jewelry-related questions, but direct your chemistry questions to the company, please.
Have a wonderful day, and please…Stay Wired Up!!! gail

Tuesday, June 13, 2017

Our Beloved Copper and Learning About Gun Blue - Lesson Two

To start out, I'm giving kudos to Szarka Carter of Magpie Gemstones. She is the one that turned me on to gun bluing for copper. Not personally, but I remember when I first started working with copper wire years ago, reading something she wrote about using it to oxidize her copper. And let me tell ya...I ran right out and got some, cause I really did not like using LOS (Liver of Sulfur)! It stinks, it's finicky, and well...you basically do not want to inhale it. More on LOS next time.

Today's topic is Gun Blue, and using it on our lovely copper creations. First of all, let's talk safety. I know there are peeps out there that don't wear gloves, masks, etc, but I'm here to tell you that on Birchwood's Safety Data Sheet they have a Hazard Section that says, and I quote "DANGER! MAY INTENSIFY FIRE; OXIDIZER. TOXIC IF SWALLOWED. TOXIC IF INHALED. MAY CAUSE SEVER SKIN BURNS OR EYE DAMAGE. VERY TOXIC TO AQUATIC LIFE WITH LONG LASTING EFFECTS." Gun Blueing is a chemical solution, made up of 2 acids, a sulfate, and water. If you would like to download the Data Sheet for yourself, you can find it here.

I never never never take a chance with any chemical, not on my skin, in my nose, or in storage. I wear rubber gloves from the dollar store, after I take off my rings and other jewelry...just to be safe. Who wants to accidentally darken their rings or watch, right? As far as not breathing in the stuff, if you have  a window close by, you can open it slightly. If you have a fan, it would serve you well to use both of them, especially if you have any sort of lung issues. I have one and one-half lungs. Trust me, if you are standing over it for a half-hour or so, you need ventilation or a mask. And please, wear the gloves because of your skin, too. Why take the chance. I know, I make it sound really caustic, don't I? I've been using it for years, but with the safety measures I take, so far, so good.

Perma Blue, the brand name for the Birchwood product, is also not good to be leaving around where the kids or your pets can get to them. I don't have to worry about that so much. I don't have kids around or pets right now (so sad). Perma Blue products do have child proof lids on them, but take extra measures to make sure your loved ones are safe, too.

Like I said, I buy the larger size, which seems to last forever. When it comes (and they may not ship it to your PO Box, so just be aware of that.), it will come with a metallic seal. I do not peal the whole thing off; I poke a
hole in it large enough I can squeeze some of it into my glass container. Use a screw driver or a sharp knife. Just remember to wash it off well, after your done...the knife or screw driver. Okay, you  knew that...I just poke a hole because in my mind, it might help to keep the product fresher longer. I cannot, however, document that.
 
Use a glass container to store the Gun Blue you are using in...one with a good lid, preferably metal. Get a container large enough to dip your items in. I use a wide mouth jar from Hobby Lobby. I keep the rest of my unused large bottle in a resealable plastic bag, just cause I like to be extra safe. Keep that out of reach of children and pets, as well. I cannot stress enough...there is no home remedy for swallowing this stuff. It would be an immediate visit to the ER!

Here is my set up, which I will talk more about when we actually get to using your Gun Blue. And, as you might notice, my wide mouth jar has a baggie between the jar and the lid.
Here's why. My first jar's lid had a liner in it. I think it was some sort of coated pressed cardboard. This new container's lid did not. What I had was bare metal, but I thought...okay...I will give it a go.

Here is what happened.
 Nice lid, huh?
Yep, for some reason this product can sweat, which it did, and it started to rust out my lid, probably my cheap lid, so I decided to use a baggie to give the lid a little more protection. I've been doing that for over eight months now and it's working. No problem.

So...Here is the list of things you will need to work with Gun Blue on copper wire, besides the wire:
  • Gun Blue...like, no kidding, Gail
  • Rubber or Nitrile gloves
  • Glass jar with a wide mouth
  • Some sort of handmade copper hook ( I forgot this, but it's to dip your product in the Gun Blue. More on that later)
  • Ventilation and/or a face mask (not one for Halloween!)
  • And a towel to work on
I guess that is about it for your introduction to Gun Blue. Yeah, you wanted more, didn't you? Baby steps, kids. Next time I will be discussing using Liver of Sulfur, much the same way as I did here. After that, we get to work. We will be using both side by side and you can be the judge. On paper, at least. I get stuck with the smell. Love you all. Don't forget...
Stay Wired Up!!!

Thursday, June 8, 2017

Introduction to our Beloved Copper and a Little Bit on Oxidation - Lesson One

I've seen a lot of question on Facebook and the Internet from different skill levels of people working with copper wire or plate about why copper does what it does, like kink and break. I've worked with copper wire and copper items for about seven years now, and decided to share some of my research to possibly help any of you along in your quest to work with copper. Some of this information may seem a little too "scientific" for your personal taste, but I figure if we are really going to understand what we are working with, we need to know it inside and out, and I'm starting at the beginning, cause I'm a "why" person.

Copper, as you probably know, is a soft or malleable metal, and one of the few natural metals not silver or gray in color. It is highly conductive to electricity and heat (meaning both travel easily through copper), but copper does not easily corrode. That should mean something to us that use Gun Blues or Liver of Sulfur on our copper wire or sheet, but we'll talk about that later.

The simplest answer I could find about why copper is softer than some of the other metals, and why it is so conductive, is because of its molecules size and shape. They are all the same size and shape, and cubic in nature, so they move easily against and around each other. So...copper is soft because the molecules move easily inside the copper structure, wire, etc. When we work with copper, like bending over and over, it begins to get harder to use. We call this "work hardening."

Work Hardening happens because the copper molecules start to become strained and/or deformed in shape, and defects form in the molecular structure.  And...like a great friend, if we push it and push it, it WILL break down. Copper will say, "I've had enough of you!" and break. The moral of this little story for you copper users is to bend your wire or work with your metal slowly. If you are in too much of a hurry, and push your metal or wire too fast, it will work harden much quicker, it will bend, kink, and break, as I said earlier, because all that movement deforms the molecular structure. Be patient with your wire and metal, and you will be rewarded.

Then there is Annealing, which is a whole different thing. Annealing, in my terms, is a healing process. When we anneal copper, usually around 700F degrees  (make sure you have an annealing pan, please!), it actually causes the metal to grow new grains that are free of stress within the existing molecular structure. I used to think that the molecules just spread out, making it easier to work with again, while in all actuality, with heat, the metal grows these new grains, which do away with all the molecule deformities previously a part of our wire or metal. Ya gotta love physics!

Corrosion vs. Oxygenation:
Liver of Sulfur causes copper to oxidize quicker than it would normally. Here's the difference; Corrosion is rust, like you might see in iron...it's that dark scaly and flaky layer, which is the actual breakdown of the metal. However, Oxidation is when the metal is exposed to oxygen and/or other atmospheric conditions and chemicals and becomes patinated. The natural patina on copper is copper oxide, and like on the Statue of Liberty, is a greenish or a green blue color. This natural patina actually acts as a protective layer to copper. It keeps the bottom layers of the copper from breaking down.
 VS

Liver of Sulfur is basically an Oxidizer, moving along the oxidation process on copper, silver, and some other metals. However, any wire or metal that is "coated" or non-tarnish will not respond to LOS, for short, because the chemical cannot get to the actual metal's surface. If you are buying craft wire, it will, most likely, NOT oxidize, as most craft wires are coated or non-tarnish. LOS does not corrode the copper. It merely leaves it with a brown to black patina.

Gun Blue is another product you can use to oxidize your copper, but I will write more on that in a day or two. Promise...unless I get run over. :-P

While I'm not the best at keeping up with blogging, I think my muse is back. Yeah, I've said that before and have been a real dolt about it, but I was a trainer by trade for many years, and it's time for me to get my crap together and be more helpful to others and not just creative.

This is going to be an ongoing study, so stay tuned. In the next couple of days I will be talking about using Gun Blue vs LOS on our wire, not just copper, but sterling, etc. I will also be writing about how to use these two chemicals effectively, the use of distilled water vs. tap water, cleaning of your jewelry, and so on. Stay tuned, my friends! and...

Stay Wired Up!

Wednesday, January 4, 2017

Pantone Colors for 2017 – Wow! It’s Greenery!

You can find this post on my website here:
https://ggchambers.com/pantone-colors-for-2017-wow-its-greenery/

If you've subscribed to the blog here, it is still safe to read it off my website. Sign up on https://ggchambers.com for all my new posts. There are more to come! Thanks for your patience and being a loyal follower.

Stay Wired Up!

Thursday, June 23, 2016

New Posts on the Wire Rapper Blog

 While my main blog has moved to my website: ggchambers.com, I will continue to post links to the new blog posts here. I hope you enjoy them. Have a wonderful day, and...Stay Wired Up!


Working with the Pantone Colors for 2016
and
Wire Weaving and Refining your Toolbelt - Part 1

Wednesday, April 13, 2016

Never Give Up

Depressed2You know...I've struggled with blogging as of late. There are a couple of reasons, but mostly just feeling "stale" in my thoughts. I try to make lists of things to chat about, and trust me, I do not lack for things on my list. I guess it is just a matter of feeling like someone might want to read what I write, that anyone would value my thoughts. After all, I am just like the rest of you, a struggling artist trying to make a living at what I love.

I did a show this last weekend, and actually it wasn't a huge show, but just a local festival, the Texas Wine and Art Festival. I have done this festival for four years, with a break in there when we lived in Florida for a year. It has always been an absolutely wonderful show for me from the get-go, and has always yielded me some of my greatest sales. Not only that, but I have met some wonderful people and wonderful friends. Some of us have booths next to each other every year, and all of us hug and chat when we see each other.

What I want to relay  in this message is this: I have been weaving wire for four years now, and it is starting, finally, to be more than just a love for me. Not only am I making money at it (not huge money. Don't get me wrong.), but I am starting to see return customers. And even more importantly, I am seeing people who truly appreciate the art that I represent. I see the real love for what I do. I get so excited when I hear someone remark that they have never seen anything like my work, or that they love the designs and the neatness, or that they just can't live without a piece for their collection. I also love to see that husband set down his credit card when he sees his wife fall in love with that special piece of jewelry she would just love to have. Many wives or girlfriends have walked out of my booth with tears in their eyes. How can I not want to be a part of that???

Have I struggled? You bet!! I've struggled to the point of giving up all together. Many a time have I sat in tears, wondering if I should just give it all up. After all, what I do is not cheap. Wire and stones are all expensive, and to keep stock so I can keep working at a consistent pace is a struggle, as well. Many of you may be chuckling at this point, because you know that I am a complete and utter cabochon addict and know I will never ever run out of stones to wrap! But, like anything, there are costs to what I (we) love to do.

I thank God every day that I have a husband that supports my love for art, and it doesn't hurt that he is also an artist. Not everyone is as fortunate as I am. Not every artist can do shows, and not all of us display our work as we should to get the kudos we all deserve.

My recommendation to you all, whether you display your work or not, is to keep on keeping on. If you love what you do and want to keep doing it, check out your local art galleries. You would be surprised at how many are more than willing to not only display your work, but to sell it for you. I know it's a big step for some of you, but it will help your confidence level to do so. It doesn't mean you will sell tons, but it doesn't mean you won't, either. Can't afford a tent? No biggie. Find some shows that are inside, and not all shows are expensive. Shoot, I have to save money just to accumulate enough to do the shows I do! You can do it, too. Whatever it takes, right?

And it depends on where your gallery is at. Tourist areas are the best, because out-of-towners like to take something home with them that reminds them of their trip. I have some work in a local gallery and don't sell a lot there, but once in a while a piece or two goes home with a new owner. It's the exposure and the wonderful feeling I get when something finds a new home! Getting a check translates not only into money, but into the pleasure of knowing someone else valued my work. I also have work in a rock shop some miles away, just as another suggestion.

My point is, don't give up. If you are struggling, put your work in a shop somewhere and value your own work. If you don't, no one else will. This was probably the most difficult thing for me to absorb...that I was worth it...that my work was worth it. The struggle builds character, and character creates value. Not just the value in your work, but the value in yourself. Value yourself. Feel good about YOU, not just about what you do, but if it takes valuing your work first, start there. Then, let it seep into your soul until you can place value in yourself.

imagesI love you all, and am so grateful for all of you that are in my life or are just reading this blog! Remember, value comes from within. Now...never give up! Never, ever give up!
Stay Wired Up! Gail

Sunday, October 5, 2014

To Seal or Not To Seal; That is the Question.

This necklace was sealed twice.
I know a lot of you are reading the posts about using sealers, so I want to pose this question to you all, and to others that create or collect beautiful cabochons. Here is why.

I choose to seal almost all of my jewelry projects with ProtectaClear to help protect the patina of the wire and to make my copper and sterling silver more desirable to buyers. I have done lots of shows where people love the antiqued copper but are afraid to buy until...I tell them I sealed it and discoloration should not be as big of an issue as they think. I do not lie to them. Sometimes discoloration does still happen, even though it might not be to the extent as it would had it not been sealed. And...I will reseal my items a second time for free if requested, and before it is shipped. Buyer's discretion.

Some are afraid of copper turning their skin green. Some are afraid it won't hold it's color over time, and with sterling...well, the normal customer just doesn't want to deal with keeping sterling bright. Those issues and the issue of sensitive skin is why I started to seal my jewelry, even those that contain show or gem quality stones.
This was sealed once.

I want to know what "you" think about this. When the normal person buys a piece, they want it sealed. But out there are people who "collect." What I want to know is what do you think? Do you think that show quality or gem quality rocks should be sealed? And if not, is it because you believe it will harm its value?

I want to hear from you. I will post all comments (unless you write really naughty comments that others might not want to read). I am impartial here, but this is something that I, personally, want to know from my readers. Let me know what you think, and I thank you for your time in advance.

You know what I always say...Stay Wired Up!!

Tuesday, September 9, 2014

My Sealing Setup; Or How To Make the Most Out of Limited Space

Hey, I'm back! Just like a penny, you can't get rid of me. The moved sucked a lot out of me, but I decided "not" to let it get me down, and now I need to catch up.

I still get a lot of questions about sealers, what to use, what it means to "seal" a jewelry piece, and my set up. So...I decided to let you in on a little secret of mine in relation to my setup. I use about 2 foot of space in my (what used to be my) kitchen to patina and seal my hand crafted jewelry. Here it is:

This is my little setup and it actually works quite well for the space I had available to me. I lived in 525 square feet, so I had to make the best of what I had! Just to be clear, the items in the background that aren't on the towel were "not" part of the setup. That's normal kitchen stuff, of course. I suppose you could use a blender, but the end result would not be pretty...enough humor.

The wide mouth glass jars to the left are what I keep my ProtectaClear sealer and gun blue in. FYI, I got them at Michaels in the wedding department. They were $5 each and have a good seal in them. That is a must, especially when storing gun blue. I stored the gun blue in a plastic container for a while and it seemed to sweat or something and became a little too messy for me. You don't want to store your ProtectaClear in plastic either. It is a solvent based product, and according to the manufacturers plastic storage is not a good idea. They recommended glass to me when I talked to them so that is what I use.

You will also want to keep a supply of paper towels around. I buy them in bulk and write them off, cause I use a ton of them. Of course you will want gloves of some sort. I will tell you this, You might want to get them in bulk, too. The ProtectaClear can eat through those pretty quickly, at least the way I work. I am a slob and get stuff everywhere. If you are pretty careful not to get ProtectaClear on your gloves, they will last. I tried regular kitchen rubber gloves and they lasted longer, but like I said I am touchy feely, so my gloves don't last very long at all. We should all probably invest in some lightweight chemical gloves, right? Oh, don't get me wrong. The ProtectClear is non-toxic! It just likes to make dinner out of latex, rubber, or plastic.

Next up is my 3-tier bracelet holder. I wrap wax paper around the arms and tape it. When I dip bracelets or necklaces, they hang from there to dry or cure. As gooey as ProtectaClear is, it doesn't stick to the wax paper. Yeah!

I also use a couple of handmade hooks. I made these out of 18 or 16 gauge wire and use them to retrieve the jewelry pieces from jars. You can make them as short or long as you want, and you can use them over and over.

The entire set up is on two layers of old towels (I'm paranoid and I rent!) and a layer of wax paper. I keep several layers of paper towels next to the jars. After dipping, whether in gun blue, LOS, or ProtectaClear, you want to dab off the excess on the paper towels. I let the piece hang on the hook for a few seconds over the jar, because waste not want not. Then I place it on the paper towels face up for just a few seconds to soak up any remaining extra, and place the item on the bracelet holder.

What about earrings, you say? I use the cupboard knobs over my work area and a nice metal shirt hanger. I hang the hanger from the cupboard over the wax paper area, and wallah! Earrings will dry like a dream floating in the air.

The really great thing about a set up like this is it's easy to use and easy to store. I leave the wax paper on the bracelet holder for several uses. I just rotate it around the arms until it looks spent. That goes in the closet...or behind the sofa. The jars, lids tight, go back in the cupboards. If you have kids, you might want to label them poison and put them up where they can't get to them, but then you probably already knew that. My gloves, if they lived, stay on the towels and wax paper, as do the hooks, and any reusable paper towels. I fold them all up together and put them in a drawer or on my work table till next time. No need to waste the wax paper. It's good for several uses. Oh, and you can write that off, too.

So, see, it isn't that complicated. All you need is:
2 feet of counter space
Glass jars with a good seal
1 or 2 old towels
Paper towels
Wax paper
Bracelet holder of some sort
Rubber or latex gloves
1 or 2 handmade wire hooks
Gun blue, LOS, and sealer
An understanding husband, partner, or roommate (this one is essential!!)

Have fun and Stay Wired Up!!

Friday, July 18, 2014

Disillusioned

I have been so busy with things going on in my life I haven't had time to write. But now...I really feel I need to take the time. This won't be my usual blog, informative, instructional, etc., but instead I am going to rant...just a little, and I hope you will bear with me.

Disillusionment you say? Yep. My disillusionment comes from what is going on with people in my social world, or actually with peeps in general. Let me expound. I will do this in generalities, but you will get the gist.

For the most part, we all work really hard to get along on social media, as it is not only a place to connect, but a good way to market what we do. We tolerate a little bit of emotional fluctuation from our friends and the little outbursts that come with day to day life situations, because we "are" their friends. We do our best to soothe those of us that aren't feeling well or have had tragedy in their lives. We like to join in the fun and the jokes others present to us, and we respond to each others art positively and constructively. Well...most of us do most of the time.

What I see happening over and over, and not in huge numbers but enough to disturb me, is the attacks that come from inside our group, one against another. Having been a student of psychology, both animal and human, I understand the "whys" of what makes it happens. What I don't understand is just this:

For the life of me, I don't understand what makes people think they have the right to attack or make fun of someone, regardless of who they are or what they are doing. Perfection is illusive to "all" of us, not just some of us. Most of us have become who we are through things that have happened in our lives in our past and/or is genetically driven. Most of that is what makes us good, great, or superior artists. Some of it makes us good business people. Some makes us sensitive and vulnerable. Some of it makes some of us feel entitled and angry, or feel inferior to others.

Some of us use flowery expressive speech, while some of us are strictly Type A and demand the short version of the truth. Some of us are recovering Type A and have learned to love flowery speech, never intending to harm another. So what is the truth? Let's do a short examination of the truth.

Truth is most often used to mean being in accord with fact or reality. The truth is the truth, regardless of how you say it, whether you color it up with adjectives and adverbs or not. It is still the truth if it represents fact or reality...as we see it or know it. But as long as a person isn't purposely misleading someone for whatever personal reason, what's the point in attacking that person. The last time I looked, it was still a free country, and we still have the power of free speech. Otherwise, I wouldn't be able to put this to paper, or internet, or blog, or whatever.

Another thing that has brought me to tears recently (and yeah, I'm talkin' real tears here!) is that there are those that join in someone's tirade against one of their (our) own, for whatever reason they use to justify their nonconstructive criticism . And...here's a big one...have you, as a human begin, ever tried to get into another person's skin before you've criticized them? Have you asked pertinent questions to get to know the person you have an issue with? or do you just go off?

Everyone does what the do a certain way for a reason, and before you attack perhaps you should get to know that person better, ask some questions, get to know them to find out what makes them tick, what makes them do the things they do. Maybe they just need approval, maybe they don't feel well, maybe they have issues at home, or maybe they struggle with being financially stable.

Whatever this person has done to irritate you, you have an ethical and moral responsibility to resolve the issue one on one first. I challenge you to be better at this. I challenge you! When something happens that irritates you, sit back, take a deep breath, and ask yourself, "Does this person need me in some way? What makes them who they are? What makes them tick? What made they do this thing that rubbed me the wrong way?" If you can't or won't do that, then I challenge to look at your own morality and ethics.

Hey, I've been guilty of it, too. But I try to work hard not to get caught up in this destructive behavior anymore. Do I still get caught up? Yes, if I'm not careful I do, and I hate myself later for it and I try to make it right with those I stupidly wronged. Does that make me think I'm perfect. Heck no!!! But it does put me on a path of less malignant behavior and on a path of more positive, nurturing behavior.

If I could have one thing in this world, it would be for people to foresee how their words or actions can hurt or even emotionally destroy another human being. As artists, most of us are pretty sensitive, so this isn't hard to do. Social media has been a breeding ground that allows negative behavior to spill out all over the place, and it is happening more and more all the time.

People used to have to confront another person face to face if there was an issue. What do you want to bet that confrontations didn't happen very often? Now, with email and social media, those that would spread their venom have a quick and painless (for them) way to spread their negativity all over the place, and they thrive on it, like a dog is attracted to its own vomit. Sorry, that was pretty harsh, but true.

Again, I challenge you all! Before you "like" or comment on something negative, stop yourself and think about what your are doing, and what it might do to another person, one of your "friends," one of your peers. Have you done all you can do to understand who that person is? Have you truly made an effort to get to know that person? or have you chosen a bitter and self-destructive lifestyle that can and will come back to haunt you?

There is an old saying that goes like this: What goes around, comes around. And I can tell you from personal experience...it's true.

I would say my usual Stay Wired Up, but I think that would be disrespectful after all this. Thanks for letting me speak. Comments are welcome, but if they are completely caustic or mention names, they will be deleted. You have the right to right them, but I have the right to get rid of them. Thanks guys!

Saturday, May 10, 2014

What the Heck is a Soumak Weave?

There have had a lot of questions about the Soumak weave, and the variations of it that I use when weaving wire. So, I've decided there is no time like the present to cover this subject.

I discovered the Soumak weave in a tutorial on YouTube when I was first researching different types of weaves I could do with wire. I have to credit Beadaholique here, and this is a link to that tutorial: https://www.youtube.com/watch?v=8uoGp6yF5q4 .

I watched this video about 20 times, or until I came up with a variation I could live with that would work with wire. Don't get me wrong here. I probably didn't come up with anything that original, but having not been formally trained in wire weaving, this technique was new to me and I adopted it. I still use it to this day.

The Soumak weave goes back centuries, some rug experts say as early as 2000 BC. It was used in linen, as well as wool weaving. It has been used to some extent in weaving of all sorts to this day. Here is a diagram I found on the web that pretty well describes the Soumak and how it is achieved.


Diagram credit: Barbara M. Berk

www.BarbaraBerkDesigns.com


As you can see, it is what I call and up and down weave. Let me describe it in "wire-ease" to make it easier to understand for the wire weaver, and I will include some photos for all you visual folks. I am going to assume that you already know how to do some basic wire weaving, so if you have questions I don't address here, feel free to message me.

 Using the above diagram, you are going to go two wires up and loop, go two wires more and loop, go two wires more and loop until you are up to the top wire. You will make another single loop on the top wire, cross over the second wire down, and go two wires down and loop, two wires down and loop, continuing to the bottom. Just follow the diagram above and you will have a true Soumak.

The variation I use the most is shown in my series of photos here. This is the weave you have all asked to see done. I begin the same way as the diagram above.

I start out by making three rounds (Step 1) around the bottom wire. (I am using 18 gauge frame wires and weaving with 26 gauge.) Step 2: Take your weave wire up and around the second wire. Pull your wire between the first and second frame wire towards you, as seen here. Go up and around the second and third frame wire.


In Step 3, you continue the weave by bringing the wire towards you between the second and third frame wire. Take the weave wire over and around frame wire 3 and 4. Then toward you between wire 3 and 4.


  Repeat the pattern for the fourth and fifth frame wire. Your first "up" round should look like the Step 4 picture.


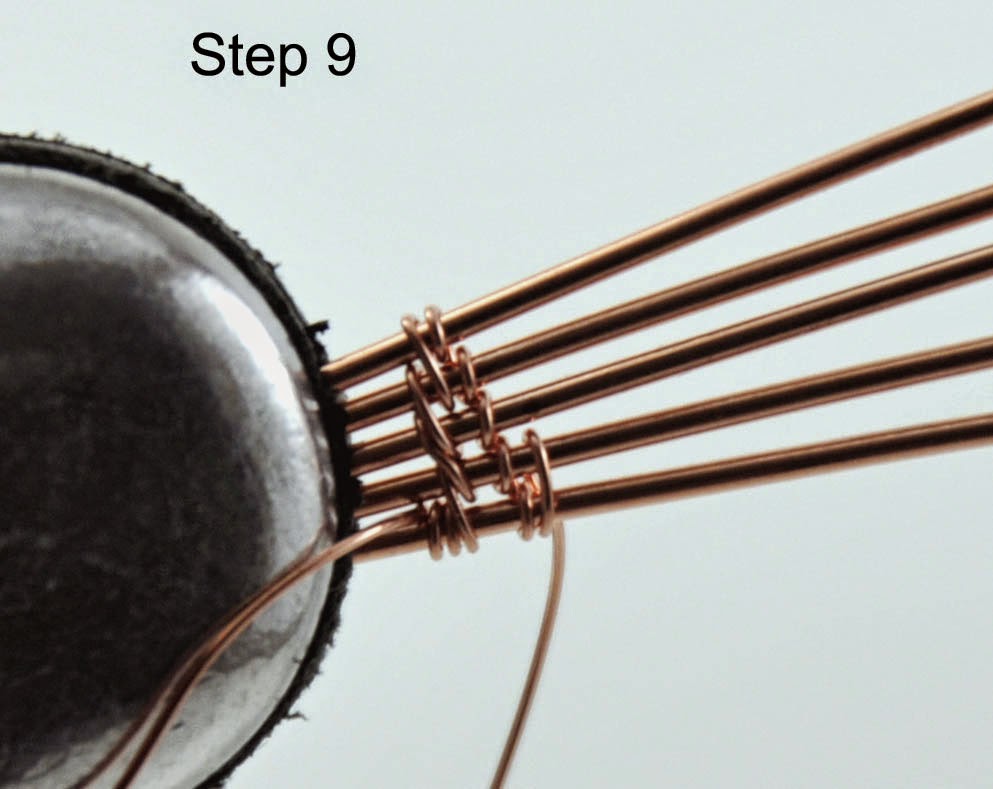
In this step, you will bring the wire towards you around wire 5 and between wire 4 and 5 and up and around wire 5 again. Just like in this photo.


At this point, you are going to reverse your thinking, and take the weave wire down two wire in the back of the frame wire, and bring it between wire 4 and and 3 towards you.


Take the weave wire around the fourth wire, as seen here. You will continue this pattern until you get to the bottom wire again.


You have just completed one full round of two-up and two-down. I hope this makes sense. And you will probably recognize the weave if you've been working with wire for any length of time. A lot of wire workers use this same weave. We just all call it something different.


You can now repeat the pattern as much as you want, making sure to push your stitches together tightly as you work.


Here is what round 2 going up the frame should look like.


Here, I have done three rounds and pushed the stitches together. 
This is the weave I use to make a lot of my bracelets.


The absolutely cool thing about this weave is that is is the same on the back as it is on the front. This is a pic of the back. Neat, huh? The idea...not my weaving...lol!

Oh, and that is my ring vice holding the wires. That is my favorite tool in the whole world, when I am weaving. I wedge that little bugger in between my left elbow and my side and have both my left hand and right hand free to separate wires and keep my weaving flowing and smooth.


That's about all I have to say about that for now. I hope this was informative and gives you an idea of how to do this particular variation of the Soumak Weave. If you have any questions or comments, be sure to let me know, and I will do my best to answer them in a timely manner.

Hugs to you all, and remember to Stay Wired Up!!!